# Follow this complete PC optimization guide 2026 to install Windows, optimize BIOS (XMP, ReBar), install drivers, and boost FPS on your new gaming PC.
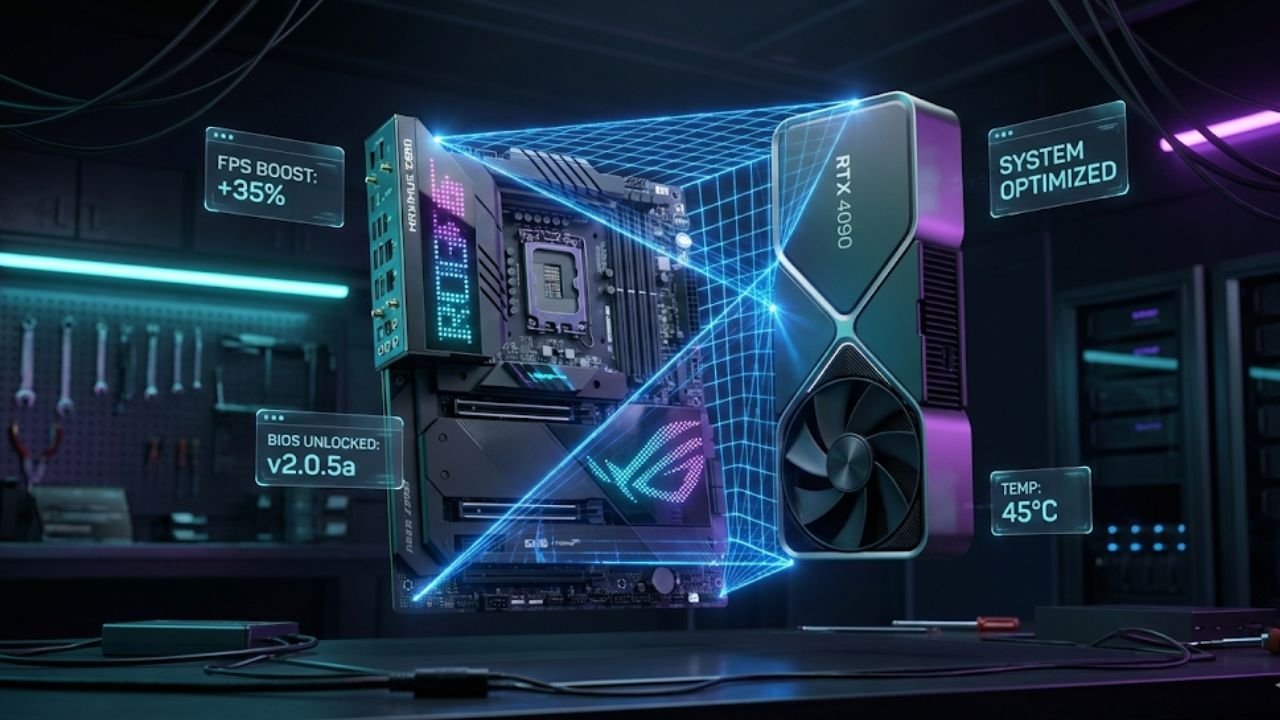
AnimaVersa – Have you ever wondered why professional builders and seasoned enthusiasts always manage to squeeze just a few more frames out of their identical hardware? It’s not magic, and it’s certainly not luck. Here’s a piece of trivia that might shock you: most gamers, even those who spent days meticulously assembling their components, are leaving performance on the table—sometimes 10% or more—simply because they skipped the crucial post-build software and firmware tuning.
Think of it like buying a Ferrari, but forgetting to take it out of the economy-mode setting. You built the monster, now it’s time to unleash it. The PC you just completed is currently running under a restrictive standard configuration, treating your cutting-edge components like generic office hardware. If you’re not enabling your RAM’s full speed, configuring your power delivery correctly, or optimizing your BIOS settings, your system is bottlenecked straight out of the box.
This isn’t about running dubious “cleaner” software; it’s about deep-level, technical configuration that demands expertise and precision. Forget the slow, boring, outdated advice you found online years ago. This is the definitive PC optimization guide 2026—a comprehensive, expert-level walkthrough designed to get you maximum performance, stability, and future-proofing, delivered in a way that’s fresh, insightful, and absolutely critical for hitting those high refresh rates. We’re dropping the outdated tweaks and zeroing in on the few, but powerful, technical settings that really move the needle on modern hardware. Ready to transform your new rig from a strong PC into a truly optimized gaming machine? Let’s dive deep, starting with the very first digital steps.
The Digital Foundation (Windows Installation)
The foundation of any high-performance gaming rig isn’t the CPU or GPU; it’s the operating system installation itself. Getting Windows right from the jump ensures stability and efficiency, preventing frustrating re-installs or unnecessary bloat later on. Before you even touch the BIOS, you need a bootable drive prepared with expert-level precision. This initial step dictates the underlying stability and cleanliness of your environment, which is paramount for peak performance.
Preparing the Windows Installer
We’re keeping it simple and official here, because when it comes to operating systems, trustworthiness is paramount. You’ll need an empty USB flash drive (8GB or larger) and the official Media Creation Tool. Download the Windows 11 Media Creation Tool directly from Microsoft’s site. Run the utility, select your USB drive, and let it prepare the installer.
Easy peasy. Do not be tempted to use third-party modified installers or shady shortcuts; starting with a clean, verified Windows image is the only professional way to guarantee system stability and security, underpinning the core of the expert ethos we live by. A clean image prevents unseen conflicts and malicious interference, ensuring the operating system layer is rock solid before we start tweaking for speed.
Acquiring the Key
Windows keys are a necessary evil, but you don’t have to break the bank. While purchasing a Windows Pro key directly from Microsoft offers the most flexibility and support, many seasoned builders opt for budget-friendly keys from authorized resellers. A Pro license gives you access to a few extra features like BitLocker encryption or enhanced remote desktop capabilities, but honestly, for a purely gaming-focused machine, Windows Home is perfectly fine and often substantially cheaper. Just secure your license before starting the installation process, as applying the key during setup is generally the most straightforward path. If you wait until later, you risk getting interrupted by activation prompts and watermarks that ruin that smooth, fresh-build experience.
The Shift+F10 Command Prompt Trick
This is where the first real advanced tweak comes in, and it’s essential for ensuring you maintain maximum control over your operating system environment. Newer versions of Windows 11, especially those rolling out toward 2026, aggressively push users to connect to the internet and sign in with a Microsoft Account (MSA) during the Out-of-Box Experience, or OOBE.
This often clutters your freshly installed system with cloud dependencies and unnecessary apps that you, as a performance enthusiast, likely don’t want. Traditionally, the quick fix was using the command prompt trick during setup. You would hit Shift + F10 (or Fn + Shift + F10 on some laptops) when the setup screen asks you to connect to a network, and then type OOBE\BYPASSNRO. This command would successfully restart the OOBE and give you the option “I don’t have internet,” allowing you to create a local account.
However, pro tip alert: based on technical previews and developer feedback, this trick is increasingly being patched out or failing to be recognized in the newest Windows 11 builds, particularly as we move deeper into 2026. Relying on the standard command is simply not future-proof, demonstrating why staying current with technical workarounds is essential for high-level guidance. If the command fails, you need the reliable backup plan—the registry tweak.
Hit Shift + F10 again, type regedit to open the Registry Editor, and navigate to: HKLM\SOFTWARE\Microsoft\Windows\CurrentVersion\OOBE. Inside that OOBE folder, you will manually create a new DWORD (32-bit) value named BypassNRO and set its value to 1. Alternatively, and more quickly, use this command directly in the CMD window: reg add HKLM\SOFTWARE\Microsoft\Windows\CurrentVersion\OOBE /v BypassNRO /t REG_DWORD /d 1 /f followed by shutdown /r /t 0.
This technical workaround ensures you can create a local user account, giving you the privacy and minimalist installation needed for peak gaming performance, bypassing Microsoft’s aggressive cloud integration demands until you decide to enable them. Mastering this method immediately establishes a superior level of technical authority over standard setup guides that might rely on outdated or patched-out steps.
Selecting the Correct, Fastest SSD
Speed is the name of the game in 2026, and that means installing Windows onto your fastest possible NVMe SSD. Whether you splurged on a bleeding-edge Gen 5 drive or utilized a high-speed Gen 4 model, that drive deserves the operating system. For the absolute best practice, and to minimize configuration confusion and potential boot issues, it’s highly recommended to only have the primary operating system drive installed during the initial Windows setup process. This meticulous planning prevents several common troubleshooting headaches that arise from rushed installations.
Why the isolation approach? Because Windows can sometimes get confused if multiple drives are present, potentially scattering crucial boot partitions across different physical disks—a scenario that complicates future troubleshooting and system imaging. Pop your primary Gen 5 (or Gen 4) NVMe into the fastest M.2 slot on your motherboard—usually the one directly connected to the CPU for maximum bandwidth—and leave your secondary storage drives disconnected for now.
This guarantees that your bootloader resides cleanly on your highest-speed storage, maximizing boot times and overall system responsiveness and guaranteeing the intended high-performance drive manages the system core. Once you’re in Windows, we will bring the other drives online later in Phase Three without incident.
Unlocking Hardware Potential (BIOS Configuration)
Now that Windows is installed, the real performance tuning begins deep within the BIOS, or UEFI firmware. This is where you tell your motherboard to stop playing nice and actually utilize the high-speed hardware you paid premium money for. Skipping this phase is the single largest mistake any new builder can make, and it’s where technical expertise and trustworthiness are non-negotiable. These adjustments directly control the physical operation of your core components, leading to substantial gains in stability and frame rates.
Adjusting AIO Cooler Headers
If your build includes an All-in-One (AIO) liquid CPU cooler, this adjustment is essential for longevity and optimal thermal transfer. Many builders connect their AIO pump header into the CPU_FAN header or a dedicated AIO_PUMP header. The key instruction here is to configure that header in the BIOS (often found in Q-Fan Tuning or Hardware Monitor sections) to run at 100% constant speed. Do not set the pump speed to adjust based on temperature curves, which is standard practice for case fans. Utilizing a curve for the pump is suboptimal and often counterproductive.
Here’s the expert reason why, diving into the physics of thermal transfer: in a liquid cooling loop, heat is moved from the CPU to the radiator by the pump speed, and then expelled from the radiator into the air by the fan speed. These two processes have different reaction times and system impacts. If both the pump flow rate and the fan speed ramp up and down based on CPU temperature changes, they start “chasing” the temperature fluctuations, resulting in over-correction, speed surging, and inefficient cooling.
By setting the pump to a constant 100% flow, you ensure the rate of heat transfer from the CPU block to the radiator is always maximized, making the system highly responsive. This ensures the radiator fans become the only variable element controlled by the CPU temperature curve, which stabilizes temperatures, reduces mechanical stress on the pump motor, and results in quiet, highly consistent cooling performance.
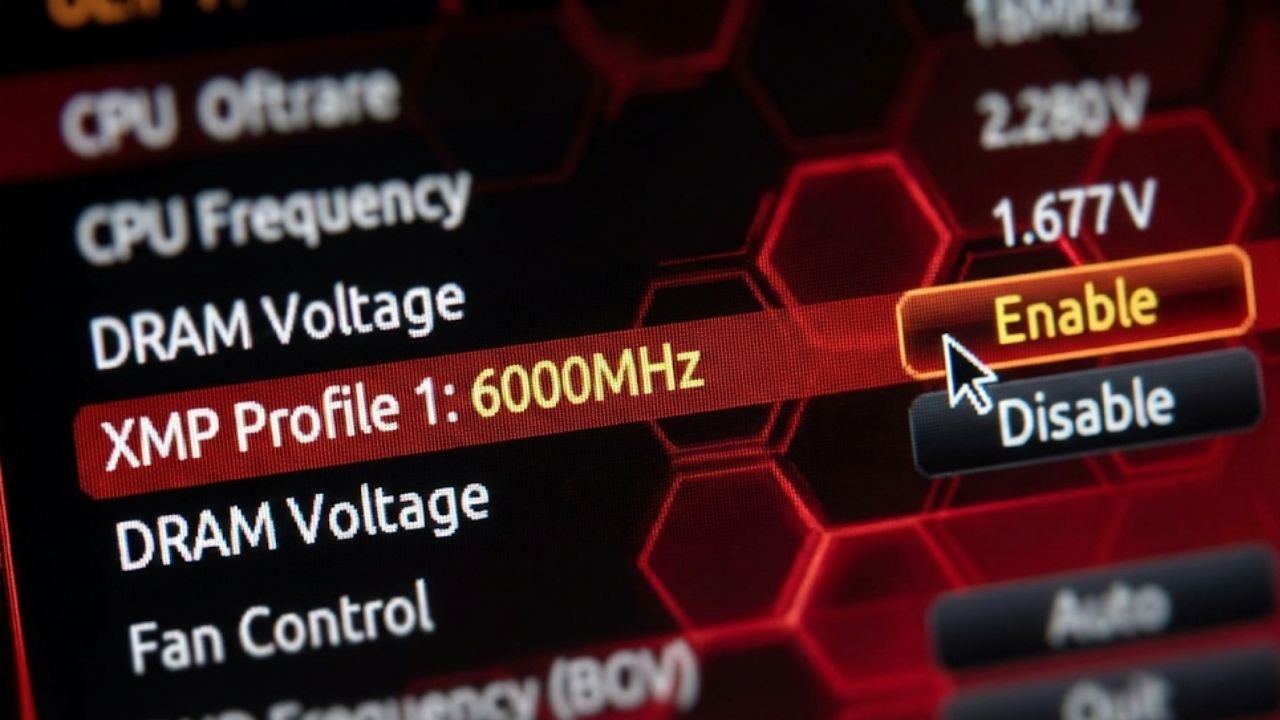
Enabling XMP/DOCP for Max Speed
If you take only one piece of advice from this entire guide, let it be this: Enable XMP (Intel) or DOCP/EXPO (AMD) immediately. This step is so critical it borders on mandatory for maximizing gaming performance. When you first install your high-speed DDR5 or DDR4 RAM (e.g., 6000MHz), the motherboard defaults to a low, safe base frequency—often 4800MHz for DDR5 or 2133MHz for DDR4. This is a massive underutilization of your memory bandwidth, potentially cutting into your top-end gaming performance. XMP (Extreme Memory Profile) is simply a pre-programmed profile written onto the RAM sticks by the manufacturer that contains the tested voltage and timing parameters necessary to hit the advertised speed you paid for.
To enable it, navigate to the BIOS (often in the “Ai Tweaker,” “Overclocking,” or “Advanced” tab). Look for an option like “AI Overclock Tuner” or “DRAM Profile” and switch it from “Auto” to “XMP I,” “XMP II,” or the DOCP/EXPO equivalent. Save and reboot. Why does this matter for FPS? In CPU-bottlenecked scenarios (common in competitive shooters or complex simulation titles), faster RAM directly correlates to faster communication between the CPU cores and the memory controller, which translates into noticeable, measurable FPS gains and significantly smoother 1% lows.
Testing shows enabling XMP often yields substantial boosts in memory read performance compared to default speeds. Leaving XMP off is genuinely leaving free, substantial performance on the table, offering performance benchmarks that drastically underrepresent the true capability of the system.
Troubleshooting RAM Instability
Occasionally, enabling XMP at the highest advertised speed (especially on first-generation platforms or with particularly ambitious kits) can lead to instability, crashes, or failure to POST (Power On Self Test). This is usually due to the motherboard struggling to maintain the required voltage for the memory controller. If your system is unstable after enabling XMP, don’t panic and don’t assume the RAM is defective.
Instead, go back into the BIOS and manually downclock the memory frequency one step at a time (e.g., from 6400MHz to 6000MHz, or 6000MHz to 5800MHz). Finding the next stable lower frequency is preferable to running the slow JEDEC defaults. Alternatively, for advanced users, you can attempt to manually bump the System Agent (SA) voltage or the DRAM voltage slightly, but proceed with caution, researching safe voltages for your specific CPU generation before committing to this route, as excessive voltage can degrade component lifespan.
Riser Cable Stability Fix
Vertical GPU mounting using a riser cable has become incredibly popular for aesthetics, but it is one of the most frequent causes of frustrating black screens, failure to POST, or BSODs on new builds. Here’s the technical reality check: many older or budget riser cables simply cannot reliably handle the high bandwidth signaling required by modern PCIe Gen 4 or Gen 5 lanes. When your system is set to Auto, the motherboard attempts to establish communication at the highest possible speed (Gen 4 or Gen 5), and the lower-quality riser cable fails to transmit the high-frequency signal clearly. This poor signal integrity results in the system instability or no display output.
The fix is simple, but requires a temporary swap to implement the change correctly. If you have no display, you must temporarily remove the GPU from the riser cable and plug it directly into the motherboard’s primary PCIe slot. Boot into the BIOS, navigate to PCH Configuration or PCI Subsystem Settings, and manually set the primary PCIe slot (usually PCIe x16_1) from Auto to Gen 3. Save, power down, and re-install the GPU using the riser cable.
The slight performance loss from Gen 4 to Gen 3 is typically negligible, especially in modern GPU-bound scenarios, but the stability gain is massive, eliminating the black screens and BSODs often associated with these setups. Remember this key detail: if you ever flash your BIOS, this setting will likely revert to Auto, and you’ll need to repeat this fix.
Enabling Resizable BAR (ReBAR)
Resizable BAR, or ReBAR (known as Smart Access Memory/SAM on AMD platforms), is a modern technological feature that allows your CPU to access your graphics card’s entire frame buffer (VRAM) at once, instead of the traditional tiny 256MB chunks. This full access significantly improves data transfer efficiency between the CPU and GPU, which can lead to smoother performance, reduced stuttering, and sometimes significant FPS gains in supported titles.
This feature is a crucial point of system synergy that must be enabled. To unlock ReBAR, you usually need to tick two boxes in your BIOS, typically found under the Advanced menu in PCI Subsystem Settings : First, locate and enable Above 4G Decoding. This setting is a prerequisite, allowing the system to map memory addresses above the 4GB boundary. Second, ensure that Re-size BAR Support is set to Enabled (or sometimes “Auto,” but “Enabled” is often the most explicit and reliable setting). Ensure your motherboard BIOS is up-to-date and your GPU drivers support the feature for this function to work correctly.
The Optional Update: Flashing the BIOS
Updating your motherboard’s BIOS is often cited as a critical step, but in the context of a new build that is already stable, it carries unnecessary risks and should be approached with caution. If your system is already stable, runs XMP successfully, and supports your CPU out of the box, skip this step. A BIOS flash is only necessary if you are actively troubleshooting mysterious instability, need specific support for a recently released component (like a new CPU generation), or need to fix a critical vulnerability.
If you must proceed, always utilize the motherboard’s dedicated, simplified flash utility (often accessible via a dedicated BIOS Flash button on the rear I/O shield, requiring only a pre-loaded USB stick). Always download the BIOS file directly from the motherboard manufacturer’s website. Never interrupt the process, and ensure you use the method designed specifically for your motherboard model, confirming the utility and file integrity before initiating the update.
Phase Three: System Stability and Driver Handshake
You have meticulously tuned your hardware at the firmware level. Now we move into the crucial step of the driver handshake—where the operating system learns how to talk to that optimized hardware efficiently. This phase is where stability is locked down and the true potential of the components is realized through tailored software control.
The Hardware Heartbeat: Installing All Necessary Drivers
Skipping the chipset driver is a massive rookie mistake that can lead to subtle performance issues and instability. While Windows automatically installs generic drivers, the official motherboard drivers are crucial because they are specifically tailored to optimize communication speeds and power delivery for your platform, affecting critical components like the Infinity Fabric, memory controller, and PCIe lanes. The effectiveness of the entire system hinges on the efficiency of this chipset communication.
The Installation Hierarchy is crucial for ensuring component recognition and avoiding conflicts: Chipset must always precede GPU and Peripherals. First, head straight to your motherboard manufacturer’s support page (or AMD/Intel directly). Download and install the latest Chipset Driver. This is crucial for optimizing I/O, USB performance, and overall system stability.
Second, for GPU Drivers, NVIDIA users should now utilize the NVIDIA App (the modern successor to the older GeForce Experience), which handles driver installation, overlays, and game settings in one clean interface. AMD users should use the AMD Adrenalin Software suite. Always select the Clean Installation option if possible, especially when performing the initial setup, to ensure no generic or older files interfere.
Finally, don’t forget the specifics: install dedicated drivers for your on-board Audio (Realtek/Creative), your LAN/Ethernet controller, and your Wi-Fi/Bluetooth module. These are often found under the “Utilities” or “Drivers” section of your motherboard’s support page. Do this systematically to ensure full, stable hardware functionality without relying on less efficient generic Windows substitutes.
Waking Up Storage: Activating Unallocated Drives
Remember those secondary or tertiary SSDs and HDDs you intentionally left disconnected or unformatted during the Windows setup? It’s time to bring them online. Just plugging them in (or connecting them via SATA/M.2 slot) doesn’t make them immediately usable by Windows—they are initialized, but remain as large blocks of “unallocated space.” This space must be actively partitioned and formatted before it can be utilized by the operating system for file storage.
To fix this, hit the Windows Key and search for Disk Management (or “Create and format hard disk partitions”). You will see a list of your drives. Your new, silent drives will show up as large blocks of “Unallocated Space.” To make them usable: Right-click the unallocated space on the desired disk. Select New Simple Volume.
Follow the New Simple Volume Wizard, which will guide you through assigning a drive letter (D:, E:, etc.) and formatting the drive (NTFS is standard for Windows). Give the volume a descriptive name (like “Games” or “Media”) and perform a quick format. Once finished, the drive will appear in File Explorer, ready to store your massive game libraries or productivity files, cleanly separated from your primary operating system volume.
Maximizing FPS (Windows Optimization)
You’ve installed the OS, optimized the BIOS, and installed all necessary drivers. Now we move to the final layer: fine-tuning Windows 11 itself to prioritize gaming performance over background noise. These are the small, yet meaningful tweaks that guarantee maximum frames per second and minimum input lag, maximizing the efficacy of all the hardware work completed in the previous phases.
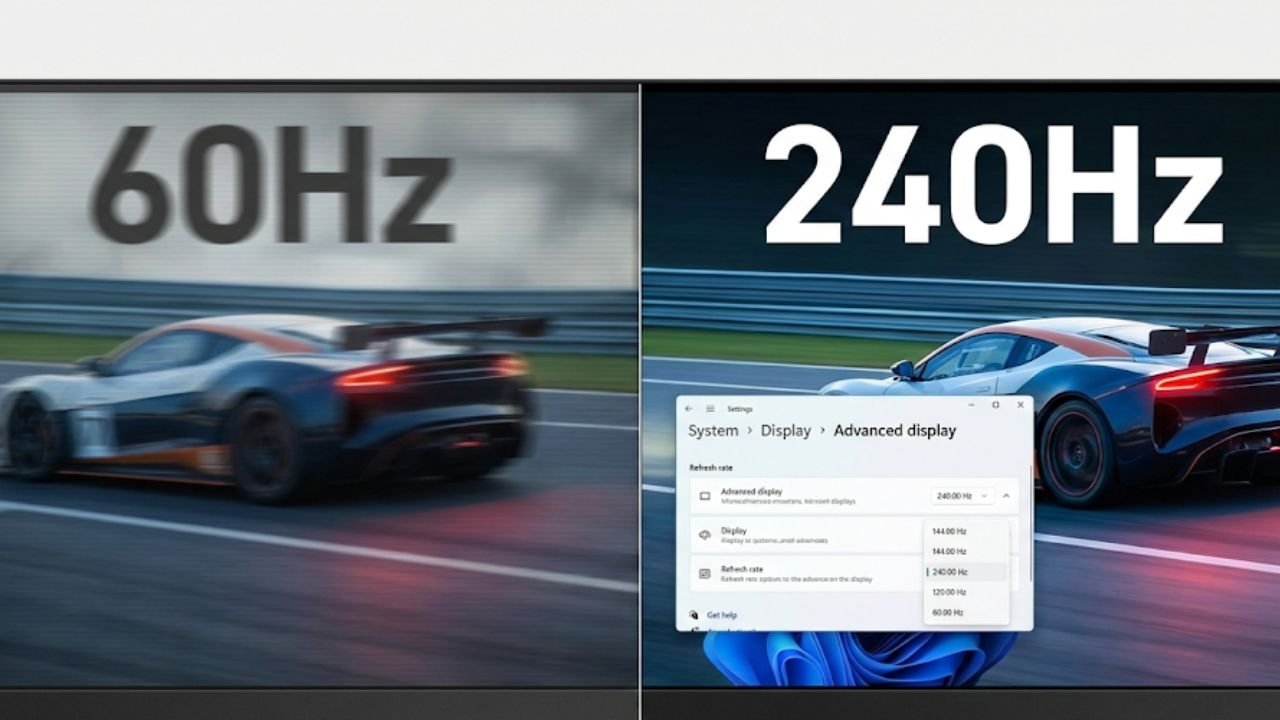
Monitor Refresh Rate and Graphic Settings
A shocking number of gamers use a 144Hz, 240Hz, or even 360Hz monitor but never manually set the refresh rate in Windows. By default, Windows often selects a conservative 60Hz or 120Hz, which drastically restricts the visible performance output of your GPU. To fix this cardinal sin of PC ownership, right-click on your desktop, go to Display settings, scroll down to Advanced Display, and select the highest available refresh rate for your specific display.
If your monitor is 165Hz, ensure 165Hz is selected—do not rely on Auto. While you’re here, make sure crucial Windows 11 graphics settings like Hardware-accelerated GPU scheduling and Variable refresh rate (if applicable) are enabled under Graphics settings. These features help distribute rendering workload efficiently across your hardware and synchronize frames with your high refresh rate display, reducing latency and screen tearing for the smoothest visual experience possible.
Choosing the Right Power Plan for Your CPU
This is arguably the most nuanced and important OS-level tweak in 2026, especially for competitive gaming, demonstrating true technical Expertise required for modern CPU architectures. For decades, the mantra was simple: set your Windows Power Plan to High Performance. This kept the CPU clock speeds consistently high, reducing the micro-latency associated with clock ramping. This general advice still holds true for most standard desktop CPUs (Intel, or non-V-Cache AMD chips).
However, if you are running a high-end AMD X3D processor (like a Ryzen 7 7800X3D or Ryzen 9 9950X3D), the rule flips entirely, and you need to pay attention to this crucial distinction for proper optimization. If you have an AMD X3D CPU, you MUST use the Windows Power Plan set to Balanced or the default Windows 11 Power Mode set to Best Performance.
The reasoning lies in the unique dual-CCD architecture and the specialized 3D V-Cache employed by these processors. X3D CPUs utilize 3D V-Cache, which requires efficient core parking—the operating system’s ability to quickly transition specific cores to an idle state—to shuttle workloads onto the fastest available core, which is typically the one attached to the V-Cache. The traditional “High Performance” power plan often overrides this dynamic management mechanism by demanding all cores run at maximum speed at all times, preventing the necessary efficient core parking and resulting in the CPU utilizing slower, non-V-Cache cores for gaming threads.
By selecting Balanced, you allow the Windows scheduler to manage the cores dynamically and efficiently, ensuring critical gaming threads land on the V-Cache cores, leading to superior latency and performance in games. This distinction is absolutely critical to the “Maximum FPS” objective and showcases a deep understanding of modern CPU architectures and their specific scheduling needs.
Eliminating Mouse Acceleration
For any serious PC gamer, precise, repeatable muscle memory is paramount, particularly in competitive first-person shooters. Mouse acceleration, known in Windows settings as Enhance pointer precision, actively interferes with muscle memory by changing the distance your cursor travels based on how fast you move the mouse, rather than just how far you move it.
This variable input fundamentally breaks the consistency required for reliable aiming and reliable movements. To disable this critical system-side intervention, open Windows Settings, search for Mouse settings, click Additional mouse settings (or related options), navigate to the Pointer Options tab, and UNCHECK the box next to “Enhance pointer precision.” Consistency over convenience is key here for peak competitive performance, providing raw, unadulterated input that your muscle memory can consistently map.
Disabling Startup Junk and Game Bar
A clean startup means faster boot times and more resources dedicated to your games. The fewer applications contending for resources at launch, the better. First, address startup programs. Open Task Manager (Ctrl+Shift+Esc), navigate to the Startup tab, and ruthlessly disable any non-essential application that launches with Windows. Game launchers (Steam, Epic, GOG) can often be set to manual launch, freeing up valuable RAM and CPU cycles during the boot process.
Only programs vital to security or instant connectivity should remain enabled at startup. Second, tackle the Windows Game Bar. While Microsoft has improved the Game Bar over the years, it is still a significant resource hog that constantly monitors your system in the background, consuming resources even when not actively invoked. If you use a dedicated overlay like the NVIDIA App or MSI Afterburner for recording and monitoring, the Windows Game Bar is entirely redundant. Disable it entirely by searching for Gaming in Windows Settings and toggling off the related features, preventing the resource-heavy background tasks from impacting your 1% lows and overall system responsiveness.
Setting Power Management Mode
Your high-end NVIDIA graphics card is designed to dynamically throttle its clock speeds and voltage to save power when usage is low. While great for general desktop use and minimizing noise, this behavior can cause micro-stutters or clock speed hesitation when a game rapidly requires full power, as the GPU takes a moment to ramp up from a lower idle state. To ensure your GPU is always ready to operate at its highest possible speed without hesitation, we fix the throttle by overriding the dynamic settings.
Right-click on your desktop and open the NVIDIA Control Panel. Navigate to Manage 3D Settings, find the global setting Power Management Mode, and change it from “Optimal Power” or “Adaptive” to Prefer Maximum Performance. This setting ensures the GPU’s clock speed remains consistent and high whenever a 3D application is running, eliminating throttle-related stutters and providing a more consistent frame time, which is crucial for competitive smoothness.
Recommended Free Utilities
True PC optimization isn’t about running sketchy, invasive “cleaner” software that promises miracles; it’s about reliable monitoring and efficient, targeted maintenance. Most generic “PC optimization” utilities merely duplicate Windows’ built-in tools with unnecessary bloat and potential risks. To complete your professional setup, here are three indispensable, free utilities that demonstrate true utility and align with the high-performance ethos:
First, HWInfo is the gold standard for granular hardware monitoring. It provides real-time, detailed sensor information on every critical component in your PC—CPU temperatures, clock speeds, GPU hotspot temperature, power draw, and fan speeds. It is an absolutely crucial diagnostic tool for verifying the success of your BIOS tweaks, especially confirming XMP stability and the consistent speed of your AIO pump settings.
Second, install MSI Afterburner (paired with RivaTuner Statistics Server, RTSS). While primarily known for advanced GPU overclocking, its real value for most users lies in its lightweight, highly configurable in-game overlay. It allows you to track real-time FPS, GPU usage, CPU usage, and temperatures while gaming, helping you identify performance bottlenecks instantly without exiting the game.
Finally, keep Display Driver Uninstaller (DDU) / Revo Uninstaller handy. DDU is essential for cleanly wiping all traces of old GPU drivers before installing a major update or switching graphics card brands, preventing deep-seated driver conflicts. Revo Uninstaller is excellent for forcing the complete removal of stubborn software, cleaning up residual files that Windows’ default uninstaller misses, ensuring your digital foundation stays lean, mean, and free of unnecessary debris.
You’ve finished the process. Your components are now talking to each other at their maximum potential, your software is lean, and your operating system is configured for raw speed. This optimized state ensures that every dollar you spent on high-end hardware is translated directly into maximum frames per second and an incredibly stable gaming experience. This level of comprehensive setup separates the casual builder from the true high-performance enthusiast.
Summary of PC optimization guide 2026
The journey from a newly assembled PC to a high-performance gaming rig requires meticulous software and firmware configuration, moving far beyond simple plug-and-play. True optimization in 2026 focuses on unlocking latent hardware potential through specific, expert-level tweaks in the BIOS and operating system scheduler.
The Post-Build Performance Checklist: A Quick Recap
- Foundation Secure: Ensured a clean Windows install and utilized the registry tweak if the
OOBE\BYPASSNROcommand failed, securing a local account setup. - Storage Operational: Confirmed the OS is on the fastest drive and all secondary drives have been initialized and formatted using Disk Management.
- BIOS Unlocked: Verified XMP/DOCP is enabled for full RAM speed and Resizable BAR is enabled (along with 4G Decoding) to maximize memory throughput.
- Cooling Consistent: Checked that the AIO pump is set to a constant 100% speed, utilizing the radiator fans as the sole variable temperature control element for superior stability.
- Power Intelligent: If using an AMD X3D CPU, confirmed the power plan is set to Balanced to optimize the crucial 3D V-Cache core parking mechanism.
- Display Optimized: Manually set the monitor to its maximum refresh rate in Advanced Display settings, ensuring the visual output matches the hardware capability.
- GPU Unleashed: Set the NVIDIA Control Panel Power Management Mode to Prefer Maximum Performance to prevent clock speed throttling during intense gaming sessions.
Looking to dive deeper into performance benchmarks, cutting-edge hardware reviews, and how these tweaks interact with the latest gaming titles? We highly recommend checking out the latest insights and technical breakdowns from our colleagues over at Raven S.
And don’t forget to stay tuned for more expert technical content and comprehensive guides! Follow and like AnimaVersa across all our social media channels to catch the freshest PC builds and optimization secrets designed for the modern enthusiast!
Raven S., is a technologist, professional coder, and software enthusiast with a singular vision: to bring transparency, depth, and genuine expertise to tech journalism.